Ever wondered how the keyboard you’re typing on was made? Dive into the fascinating world of injection molding!
Injection molding machines create keyboards by melting materials like ABS and polycarbonate, injecting them into precision molds for keycaps and bases, cooling them, and assembling the final product.
I remember the first time I saw an injection molding machine in action. It was mesmerizing to watch the molten plastic transform into something tangible and functional. Each keyboard component—from the keycaps to the base—emerges from its mold, ready to be pieced together like a puzzle.
The journey begins with designing molds that shape each keycap perfectly, accommodating everything from concave surfaces to imprinted symbols. Selecting the right material, like durable ABS for keycaps, is crucial for quality and feel.
For the base, materials like polycarbonate are chosen for their strength. It’s a dance of precision and timing, ensuring each piece fits just right, leading to the grand finale: assembling these parts into a cohesive keyboard. It’s an art form that transforms raw materials into everyday tools.
ABS is used for keyboard keycaps in injection molding.True
ABS is a common material for keycaps due to its durability and finish.
Injection molding machines do not use molds for keyboards.False
Molds are essential in shaping the keyboard components during injection molding.
What Are the Steps in Designing Keycap Molds?
Ever wondered what goes into designing keycap molds for your favorite mechanical keyboards?
Designing keycap molds involves understanding keycap shapes, selecting suitable materials, crafting precise designs, and executing the injection molding process for high-quality results.

Understanding Keycap Shapes
The first step in designing keycap molds is to understand the different shapes and features of keycaps. I remember when I first started, I was amazed at how something as simple as the top surface could vary so much—from flat to concave, each design offering a unique feel under your fingertips. Then, there’s the challenge of getting the sides and bottoms just right to ensure they fit perfectly with the keyboard switches. It’s like solving a puzzle where every piece needs to fit flawlessly.
Material Selection
Choosing the right material can be a game-changer. Personally, I’ve always found ABS (Acrylonitrile Butadiene Styrene) to be my go-to because of its strength and smooth finish—plus, you can color it to your heart’s content! But then there’s PBT (Polybutylene Terephthalate), which has this amazing texture and can withstand higher temperatures. It reminds me of the time I switched from ABS to PBT for a project and discovered how tactile feedback can enhance the typing experience.
| Material | Properties |
|---|---|
| ABS | Durable, smooth finish |
| PBT | High heat resistance, textured |
Crafting the Mold Design
Creating a mold design is like painting a masterpiece in CAD software1. Every detail counts, especially when you’re dealing with intricate features like lettering or symbols. I once spent hours perfecting a design only to realize that a minor tweak made all the difference in the final product.
- Top Surface: Flat, concave, or custom shapes.
- Side Features: Ensures snug fit on switches.
- Bottom Design: Needs reinforcement for durability.
Injection Molding Process
This is where the magic happens. Melting the plastic and injecting it into the mold cavity requires precision. One misstep and you could end up with imperfections. I learned this the hard way during an early project—it taught me the value of patience and precision.
Quality Control
Finally, quality control ensures everything is just right. Every keycap is inspected for defects. It’s like when I double-check my work before submitting it—ensuring quality from start to finish. Sometimes, additional finishing techniques2 like painting can take a good design to great.
Incorporating these steps guarantees that the keycap molds are not just functional but also a joy to use and look at. By mastering each phase, from design to manufacturing, I’ve learned how to create keycaps that meet both aesthetic and functional needs.
ABS is used for keycaps due to its colorability.True
ABS is favored in keycap production for its strength and ability to be colored.
PBT has a smooth finish like ABS.False
PBT is known for its high heat resistance and textured finish, unlike ABS.
Which Materials Are Best for Keyboard Components?
Crafting the perfect keyboard is like building a trusty sidekick; it all starts with the right materials.
Keycaps are best made from ABS or PBT plastics for texture and durability, while keyboard bases benefit from aluminum or polycarbonate for stability and aesthetics.
Exploring Keycap Materials
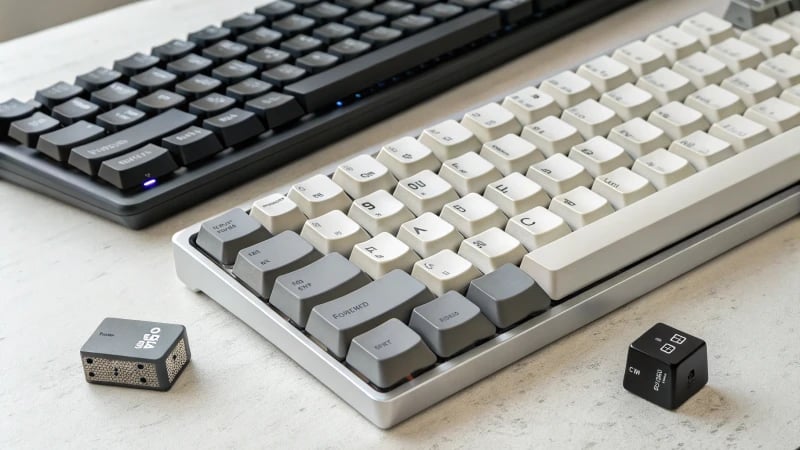
When I first started my journey into keyboard customization, choosing the right keycap material felt like picking the right pair of shoes—important for both comfort and style. ABS and PBT plastics are two popular contenders in this arena.
ABS (Acrylonitrile Butadiene Styrene) has always been a go-to for me, especially since it offers such vibrant colors. I remember the first time I swapped out my keycaps for some ABS ones, the smoothness was like gliding your fingers across a piano. Though, I did notice over time, they began to shine like an old leather jacket.
PBT (Polybutylene Terephthalate) is like that reliable friend who’s always got your back—textured and resilient. When I switched to PBT, I loved how the matte finish felt under my fingers and how it stood the test of time.
| Material | Characteristics | Pros | Cons |
|---|---|---|---|
| ABS | Smooth, colorful | Durable, versatile | Can become shiny |
| PBT | Textured, matte | Long-lasting, wear-resistant | Limited color options |
Crafting Keyboard Bases
The base of a keyboard is like its backbone, crucial for stability and style. I remember experimenting with an aluminum base. Its weight was reassuringly solid, making each keystroke feel grounded and deliberate.
Then there’s polycarbonate (PC), which caught my eye with its transparency. Perfect for backlit keyboards, it provides a strength that feels almost unbreakable. I found it especially handy when I wanted something lightweight yet sturdy for traveling.
| Material | Characteristics | Pros | Cons |
|---|---|---|---|
| Aluminum | Sturdy, sleek | Stable, premium feel | Heavier |
| Polycarbonate | Transparent, strong | Impact-resistant | Might scratch |
Injection Molding in Keyboard Production
Injection molding is where the magic happens, turning raw materials into functional art. For keycaps, a well-designed mold is essential to ensure they fit snugly onto the switches. Using ABS or PBT through injection molding has allowed me to create keycaps that are both durable and visually appealing.
In keyboard base production, the mold ensures that each switch sits perfectly in place. Depending on whether I want a heavier aluminum feel or a light polycarbonate touch, the choice influences how I design my molds.
Assembly Considerations
After production, assembling these components feels like piecing together a puzzle. Attaching the keycaps to their respective switches on a printed circuit board (PCB) completes the electrical connectivity. It’s these details that transform a collection of parts into a cohesive unit.
Every choice we make in materials affects not just how our keyboards look or feel but also their longevity and performance. Whether you’re aiming for a rugged aesthetic or a sleek minimalistic vibe, understanding your needs is key to crafting your perfect keyboard companion.
ABS keycaps become shiny with prolonged use.True
ABS plastic is known to develop a shine over time due to wear.
Polycarbonate bases are heavier than aluminum bases.False
Aluminum is heavier, providing stability, unlike lighter polycarbonate.
How is the Injection Molding Process Executed?
Ever wondered how your favorite gadgets come to life? The magic behind keyboards and automotive components lies in the intricate world of injection molding.
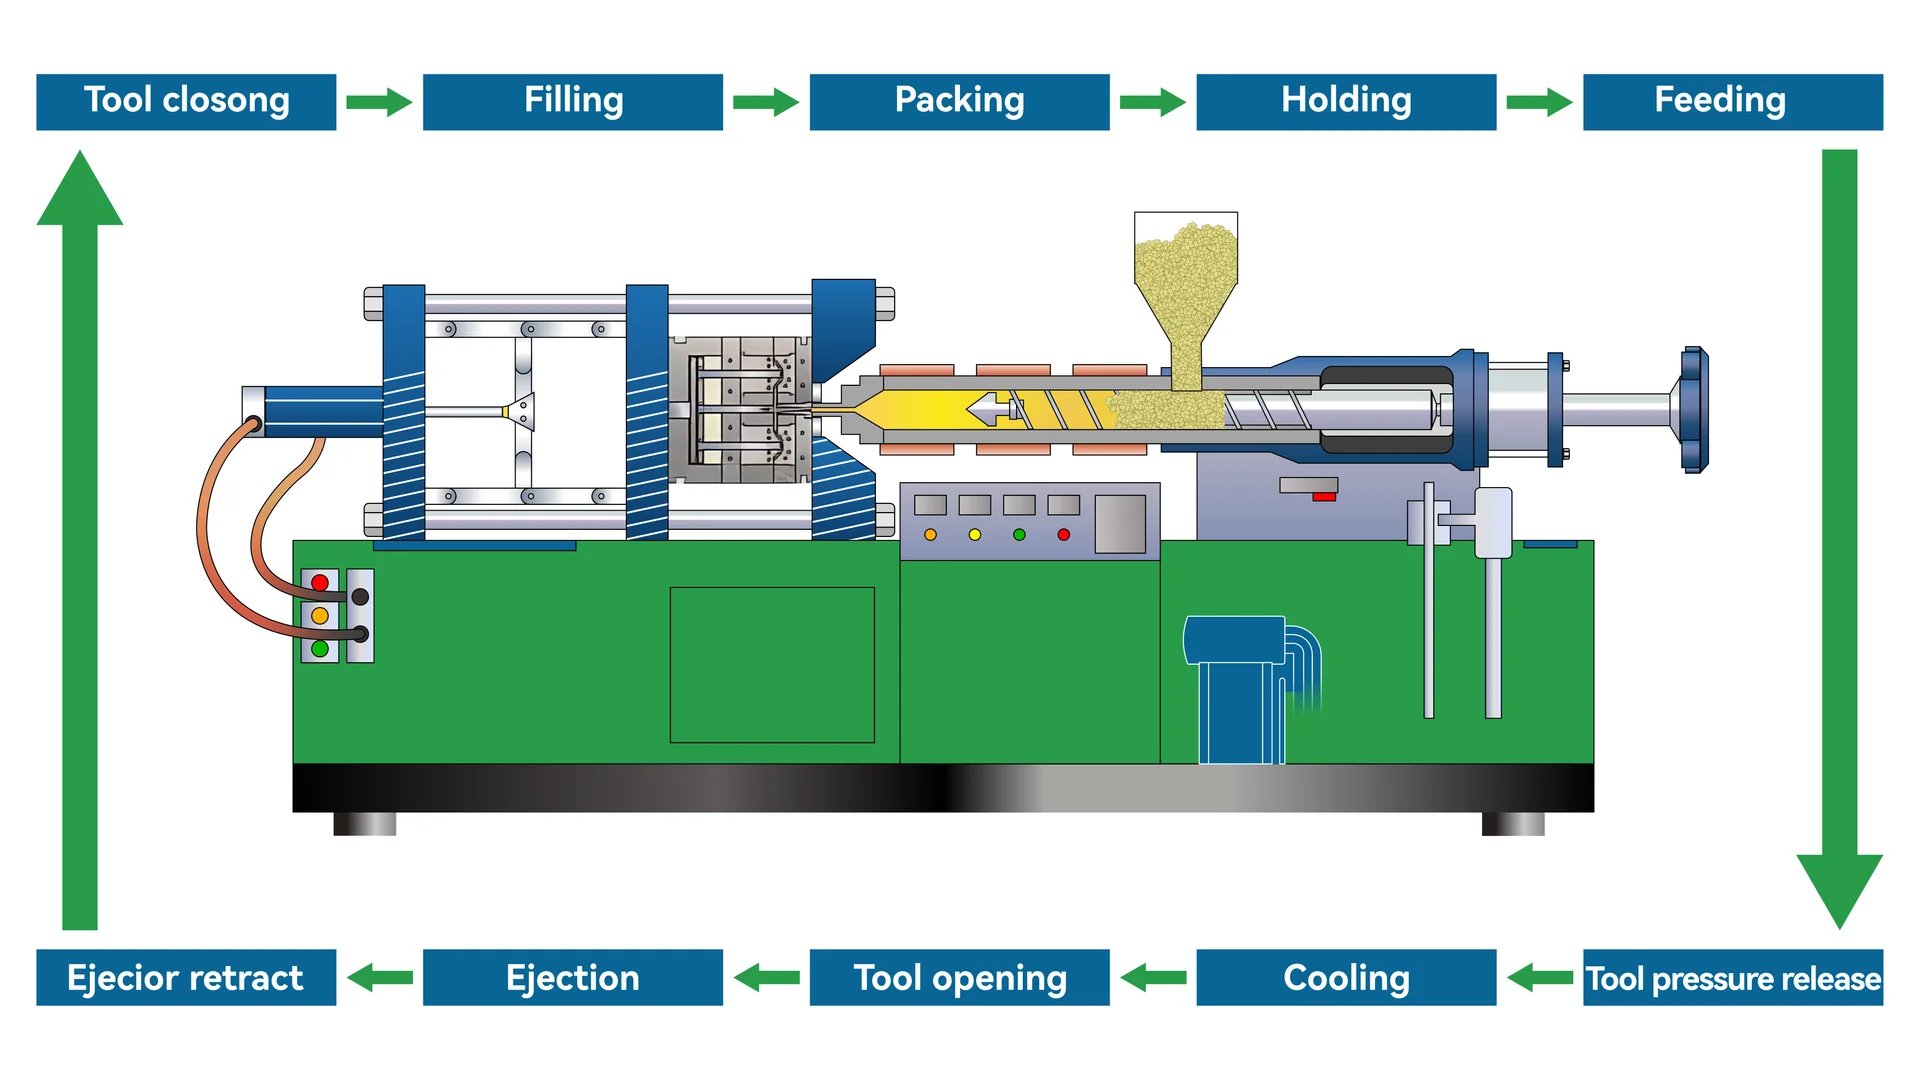
The injection molding process involves designing a mold, selecting materials, melting and injecting plastic into the mold, cooling, and ejecting the product, ensuring precise and high-quality item creation.
Designing the Mold
Every time I dive into designing a mold, it’s like solving a new puzzle. Whether it’s for something as detailed as a keyboard keycap with its intricate lettering and textures or for a solid and stable keyboard base, the initial design phase is where creativity meets precision. I remember the first time I tackled a keycap design—imagining how each little letter would feel under someone’s fingertips was both daunting and exciting.
| Component | Mold Design Focus |
|---|---|
| Keycaps | Lettering and Texture |
| Base | Stability and Wiring |
Learn more about mold design3.
Material Selection
Picking the right material feels a bit like choosing the right ingredients for a recipe. For example, acrylonitrile-butadiene-styrene (ABS) is my go-to for keycaps because of its durability and smooth finish. I learned early on that these materials not only affect the look but also the lifespan of our products. It’s like ensuring a cake not only looks good but also tastes great.
- Keycaps: ABS, easily colored for customization.
- Base: PC for strength, PC/ABS for balance.
The Injection Process
The heart of injection molding is melting those plastic granules down to a gooey consistency before injecting them into molds. Watching this transformation still fascinates me every single time. You’d think that after a decade in this field, it would lose its charm, but seeing raw material become something functional never gets old.
- Injection: Melted plastic is forced into the mold.
- Cooling: Ensures solidification of the product.
Ejecting the Product
The thrill of seeing a newly formed part emerge from its mold is akin to pulling a freshly baked loaf out of the oven. It’s all about timing and finesse—especially when dealing with delicate parts like keyboard keycaps, where any mishap could mean going back to square one.
- Ejection: Using mechanical means to release the product.
Assembly and Additional Processes
Once everything comes together, assembling components like attaching keycaps to switches or adding PCBs becomes the final stroke of artistry. Sometimes, extra steps like painting or coating are needed, ensuring every piece meets both functional and aesthetic requirements. It’s these finishing touches that turn a product into something special—something that designers like me strive to perfect every day.
Explore more on assembly processes4. Through these detailed processes, I aim to ensure every design not only looks good but performs flawlessly in real-world use.
ABS is used for keycaps due to its durability.True
ABS offers durability and smooth finish, ideal for keycaps.
Polycarbonate is unsuitable for keyboard bases.False
Polycarbonate provides strength and impact resistance, ideal for bases.
What Happens After Injection Molding in Keyboard Assembly?
Ever wondered what magic happens after those keyboard parts are molded? Let’s dive into the journey of turning simple plastic into the sleek keys we type on every day.
After injection molding in keyboard assembly, components undergo keycap attachment, electronic integration, surface finishing, quality checks, and packaging to ensure they meet required standards.
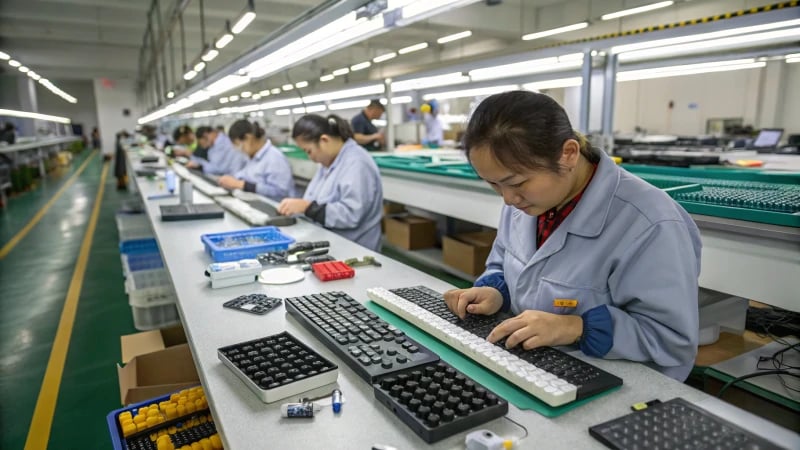
Keycap Attachment and Assembly
Imagine the precision needed when the freshly molded keycaps are carefully removed from their molds. I remember watching this process for the first time, mesmerized by how these small pieces would fit perfectly onto the switches. Using precision machinery5 to avoid any damage is like a dance, ensuring each keycap finds its rightful place. Depending on the design, they might just click into place with a simple press-fit or require a more intricate attachment method.
Integration of Electronic Components
Next up is the nerve center—the electronic components. Picture this: the printed circuit board (PCB) being meticulously placed under the keyboard base. Each switch is soldered or snapped in, almost like assembling a puzzle, ensuring all pieces communicate seamlessly. This step is crucial because it transforms a mere frame into a fully functional keyboard.
| Component | Material Used | Purpose |
|---|---|---|
| Keycaps | ABS | User interface |
| Keyboard Base | PC or PC/ABS | Structural support |
| PCB | Various | Electrical connections |
Surface Finishing Techniques
Once everything is in place, we want these keyboards not just to work well but also to look good. Surface finishing is like giving the keyboard its final makeover. Whether it’s painting or applying a protective coating, this step ensures that not only does it feel good to touch but also looks great. For backlit keyboards, this step is even more critical as it needs to balance durability and light passage for that perfect glow.
Quality Control Measures
I can’t stress enough how important quality control is. It’s like a final exam for each keyboard. They undergo rigorous tests, from checking switch actuation to ensuring even light distribution6 in backlit models. It’s about making sure that by the time a keyboard reaches you, it’s nothing short of perfect.
Packaging and Distribution
Finally, we wrap it all up—literally! The keyboards are packaged with care to avoid any damage during their journey to you. This stage might also involve creative retail packaging design7 that highlights the keyboard’s features and brand identity.
Each of these steps is a chapter in the story of how a simple piece of plastic becomes a part of our daily lives, typing away at our thoughts and dreams.
Keycaps are attached using precision machinery.True
Precision machinery is used to detach and attach keycaps to avoid damage.
PCBs are integrated after surface finishing.False
PCBs are integrated before surface finishing to ensure electrical connectivity.
Conclusion
Injection molding machines create keyboards by shaping keycaps and bases from materials like ABS and polycarbonate, involving precise mold design, material selection, and assembly processes for quality production.
-
Discover the best CAD tools for creating detailed and precise mold designs for keycaps. ↩
-
Learn about finishing techniques that enhance the visual appeal and durability of keycaps. ↩
-
Learn about mold design principles to ensure your molded products meet desired specifications. ↩
-
Understand how components are assembled post-molding for better product quality. ↩
-
Understanding precision machinery helps ensure damage-free detachment of molded keycaps, crucial for quality assembly. ↩
-
Learning about light uniformity checks ensures consistent backlit keyboard quality. ↩
-
Insights into retail packaging design help create appealing and protective packaging solutions. ↩