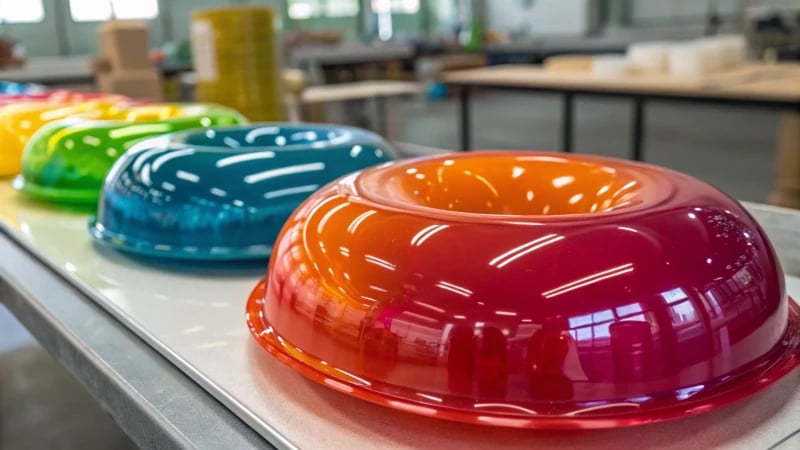
Ever found yourself staring at a dull, unpainted injection molded product and thinking, "How can I make this pop?
For painting injection molded products, prepare surfaces meticulously, select paint for compatibility, and apply via spraying or brushing. Ensure thorough drying and conduct quality checks for optimal results.
I remember my first attempt at painting an injection molded piece—I was so eager to see a transformation. It wasn’t until I learned about the importance of surface prep, choosing the right paints, and mastering techniques like spraying that I finally achieved that professional look. With each step, from cleaning with isopropyl alcohol to sanding with precision, I discovered how each detail matters in bringing out the vibrancy and resilience in the finished product. Read on for a deeper dive into these techniques that turned my early frustration into a rewarding craft.
Spraying is the best method for painting injection molded products.True
Spraying provides even coverage and a smooth finish, ideal for molded surfaces.
Brushing is better than spraying for injection molded products.False
Brushing can leave streaks and uneven layers, unlike the smoothness achieved by spraying.
- 1. How Does Surface Preparation Affect Paint Adhesion?
- 2. How to Choose the Right Paint for Injection Molding Materials?
- 3. What Are the Pros and Cons of Spraying vs. Brushing?
- 4. How Can Chemical Treatments Enhance Paint Application?
- 5. How Can I Make My Paint Last Longer?
- 6. How do I conduct a quality inspection for painted products?
- 7. Conclusion
How Does Surface Preparation Affect Paint Adhesion?
Ever wondered why some paint jobs last forever while others peel off after a season? The secret often lies in the surface preparation before painting.
Proper surface preparation, including cleaning, sanding, and chemical treatments, is essential for paint adhesion, impacting the durability and appearance of the finish.
The Importance of a Clean Surface
Imagine this: You’re about to paint your living room, and you notice tiny specks of dust and oil smudges on the walls. Just like that moment, ensuring a clean surface is essential for strong paint adhesion. I remember once using a special plastic cleaner to tackle a particularly grimy surface—wiping down with isopropyl alcohol did wonders. Removing every trace of oil and dirt truly enhances the spraying power1 of the paint, ensuring a smooth, flawless finish.
Surface Area and Reflection
You know when you’re polishing your car and it gleams so brightly, you can almost use it as a mirror? That glossy surface is great for reflection but terrible for paint adhesion. Increasing the roughness with something like 320-grit sandpaper can make a world of difference. Back in my early days, I learned the hard way that these calculated scratches improve the paint application power2.
| Sandpaper Type | Purpose |
|---|---|
| 240-400 grit | Preliminary grinding |
| 600-800 grit | Fine grinding |
Sometimes, when working on intricate designs, switching to higher grit sandpapers has been a game-changer.
Chemical Treatment Options
Certain materials, like polyolefin plastics, are notoriously difficult when it comes to holding paint. A colleague once showed me how using a primer could significantly increase surface activity. Methods like corona treatment or applying a special plastic primer can effectively boost the bond between the paint and plastic3, ensuring your hard work lasts longer.
Factors Influencing Paint Selection
Choosing the right paint can feel like an overwhelming decision. I recall a project where using the wrong type of paint on PC plastics led to unfortunate damage. For ABS plastics, acrylic or polyurethane paints work well, but PC plastics require specific, chemically compatible paints to avoid any issues. This choice doesn’t just affect adhesion but also impacts durability and finish quality.
Paint Application Methods
I’ve often found myself debating whether to spray or brush—each method has its strengths. Spraying is fantastic for covering large areas quickly, while brush painting allows for detailed precision work on smaller or oddly shaped items.
| Method | Best Used For |
|---|---|
| Spraying | Large surfaces, complex shapes |
| Brush painting | Small sizes, precise applications |
Every method requires its own set of tools and techniques. For me, adjusting spray parameters like distance and pressure is crucial for achieving that perfect uniform layer.
For more on refining these methods, dive into equipment selection4 and operational insights to hone your technique.
Clean surfaces enhance paint adhesion.True
Dirt or oil can impede paint bonding, while cleaning agents improve it.
Brushing is best for large surfaces.False
Spraying is more effective for large surfaces, not brushing.
How to Choose the Right Paint for Injection Molding Materials?
Ever stood in front of a row of paint cans, puzzled about which one to choose for your injection molded masterpiece? Let me share what I’ve learned.
Choose the right paint for injection molding materials by matching the paint type to the plastic. Use acrylic or polyurethane for ABS and ensure chemical compatibility for polycarbonate to avoid damage.

Understanding Material-Specific Paint Requirements
I remember the first time I had to pick the right paint for an ABS plastic5 project. It was a revelation learning that ABS could take a variety of paints like acrylics and polyurethane, which meant I could get creative with finishes without compromising quality. However, when it came to polycarbonate (PC) plastics6, I learned the hard way that not all paints are created equal—some can actually damage the surface if they’re not compatible. This is why understanding chemical compatibility is crucial.
| Material | Recommended Paints | Considerations |
|---|---|---|
| ABS | Acrylic, Polyurethane | Versatile with multiple options |
| Polycarbonate | Compatible, Non-Corrosive | Solvent avoidance is crucial to prevent surface degradation |
Surface Preparation Techniques
I’ve found that starting with a clean slate is key—quite literally! Using special plastic cleaners7 or even just some isopropyl alcohol can make a world of difference. It’s like giving your project a mini spa day before you start painting! Sandpaper also becomes your best friend; using 320-grit sandpaper can set the stage perfectly for that ideal finish.
Selecting Paint Based on Product Purpose
Over the years, I’ve come to appreciate that each project has its unique demands. For instance, when working on automotive parts, I lean towards polyurethane paints because of their durability. However, for decorative items, I love the high-gloss finish that nitro-based paints offer. It’s all about aligning the paint’s properties with your project’s needs, which has always been a rewarding challenge.
Evaluate each product’s functional and aesthetic needs8.
Painting Methods: Spraying vs. Brushing
- Spraying: When I’ve got a big batch to handle, spraying is my go-to. It’s efficient and ensures even coverage. Adjusting spray parameters can be tricky but is essential to avoid any mishaps like uneven coating.
- Brushing: For those intricate projects where details matter, brushing becomes indispensable. Choosing the right brush for the paint’s viscosity can make all the difference.
Drying and Curing Processes
I can’t stress enough how important it is to get the drying process right. Natural drying is fine for some paints, but when I’m using polyurethane, it’s crucial to have a controlled environment for curing. I’ve learned that patience truly pays off here to avoid common pitfalls like bubbling or discoloration.
By integrating these practices, I’ve managed to strike a balance between aesthetics and durability in my projects. For those diving deeper into this field, there’s always more to learn and explore additional resources9.
ABS plastics can be painted with nitro-based paints.False
ABS is compatible with acrylic and polyurethane, not nitro-based paints.
Polycarbonate requires non-corrosive paints to prevent damage.True
Non-corrosive paints are essential for polycarbonate to avoid surface degradation.
What Are the Pros and Cons of Spraying vs. Brushing?
Choosing between spraying and brushing for painting can feel like a big decision, but understanding the strengths and weaknesses of each can make it easier.
Spraying delivers speed and a smooth finish on large surfaces, but demands more prep and gear. Brushing offers control and precision for small areas, yet may leave marks.

Spraying: Speed and Smoothness
I’ve always found that when I need to paint something big, like a wall or a piece of furniture, grabbing a spray gun feels like having a secret weapon. It’s amazing how quickly you can cover a large area. Imagine using a spray gun like a magician’s wand, dispersing paint in a fine mist that leaves a smooth, even finish10. It’s perfect for projects where you want that seamless look.
| Pros | Cons |
|---|---|
| Fast application | Requires extensive prep |
| Smooth finish | Equipment cost |
| Good for large areas | Overspray risk |
But here’s the thing—spraying isn’t all magic. The prep work can be intense. I remember spending nearly as much time masking off areas to prevent overspray as I did actually painting. Plus, the equipment can be pricey. If you’ve ever priced out airless or electrostatic spray guns, you know they don’t come cheap.
Brushing: Precision and Control
When it comes to painting detailed areas, like moldings or intricate furniture, I can’t help but appreciate the control a good brush offers. It’s almost meditative, the way you can slowly work the paint into those tricky spots.
| Pros | Cons |
|---|---|
| Precise control | Slower application |
| Ideal for small areas | Possible brush marks |
| Lower equipment cost | Uneven texture risk |
On the downside, I’ve had my fair share of frustration with brush marks. They’re like those annoying little bumps in an otherwise perfect road trip. But choosing the right brush—like a soft wool brush—can make all the difference.
Additional Considerations
- Surface Preparation: Whether you’re spraying or brushing, starting with a clean surface is key. I’ve learned this the hard way by skipping this step only to have to redo the entire project. Use appropriate cleaning agents to remove any dirt or oils.
- Paint Selection: Not all paints are created equal. Some require specific application methods. I’ve spent hours experimenting with different types to find just the right match.
- Safety Measures: Especially with spraying, proper ventilation is crucial. I’ve had to set up makeshift ventilation systems more than once to keep fumes at bay.
In the end, your choice between spraying and brushing should fit your project needs, whether that’s the scale of the surface or your budget constraints. Sometimes experimenting on a smaller scale first is the best way to find your groove before diving into a big project.
Spraying paint is faster than brushing.True
Spraying covers large areas quickly due to its application method.
Brushing paint is more cost-effective than spraying.True
Brushing requires less expensive equipment compared to spraying.
How Can Chemical Treatments Enhance Paint Application?
Ever wondered why some paint jobs just seem to last longer, look sharper, and feel smoother? It’s all about the prep work, especially the chemical treatments that set the stage for a masterpiece.
Chemical treatments, like template and corona treatments, and primers, enhance paint application by improving surface energy and adhesion, especially on low-energy surfaces like polyolefin plastics, ensuring better bonding and a lasting finish.

Understanding Surface Energy
Picture this: you’re about to paint a sleek polyolefin plastic gadget, but it feels like the paint just slides right off. That’s because these materials have low surface energy, making them less welcoming to paint. I remember when I first tried painting a plastic model—frustrating! Thankfully, chemical treatments11 step in to modify these surfaces, making them more receptive to paint.
Chemical Treatment Techniques
Template Treatment
I once tried a high-temperature template treatment on a project and was amazed at how it transformed the surface. By briefly applying heat, the surface was oxidized, boosting its energy and preparing it perfectly for paint. It’s like giving your plastic a makeover before its big debut!
Corona Treatment
This method is a bit like adding subtle texture to a glossy magazine page, making it easier for paint to stick. Using high-frequency discharge creates micro abrasions that enhance surface activity—a trick that works wonders on shiny surfaces.
Primers
Think of primers as the unsung heroes of painting. Applying a primer acts like setting up a solid foundation for your masterpiece. The first time I used a special primer before painting plastic, the difference was night and day in terms of adhesion.
Paint Selection Considerations
Choosing the right paint isn’t just about color—it’s about compatibility and purpose. I learned this when picking paint for my first DIY project. For ABS plastics, acrylic and polyurethane paints are versatile choices. But for polycarbonate plastics, you need to be cautious with solvent compatibility to avoid any unwanted reactions.
| Material | Suitable Paint Type | Considerations |
|---|---|---|
| ABS | Acrylic, Polyurethane | Versatility |
| PC | PC-compatible | Non-corrosive |
For decorative flair, nitro-based paints offer stunning gloss and weather resistance.
Practical Applications
Industrial Uses
In the world of automotive parts manufacturing, ensuring that paint bonds strongly is crucial. Techniques like corona treatment can be incredibly beneficial12 for achieving finishes that stand the test of time.
Consumer Electronics
In consumer electronics, aesthetics matter just as much as durability. When I implemented chemical treatments on painted components for a project, I was thrilled to see how they maintained their sleek appearance over time.
Expert Insights
Professionals emphasize the importance of combining proper surface preparation with appropriate chemical treatments. This approach ensures superior adhesion and finish quality across various industries. Learning when and how to apply these processes can significantly boost both the aesthetic appeal and functional durability of your painted products. Explore more techniques13 to elevate your next painting project.
Corona treatment is effective on glossy surfaces.True
Corona treatment increases surface activity through micro abrasions, ideal for glossy materials.
Polyurethane paint corrodes polycarbonate plastics.False
Polyurethane paint is versatile and non-corrosive, suitable for ABS and PC plastics.
How Can I Make My Paint Last Longer?
Ever painted a masterpiece only to watch it peel away like a bad sunburn? Let’s dive into the methods that can make paint stick around for the long haul.
To extend paint longevity, use natural drying for volatile paints and heating for polyurethane. Managing environmental factors is vital for optimal drying and curing.

Natural Drying: A Time-Tested Method
I remember the first time I painted my garage door. I had no idea what I was doing, but I figured letting it dry naturally would do the trick. Natural drying is all about patience and finding that perfect spot with great airflow. This method works wonders for volatile paints like nitrocellulose lacquer14, where evaporation does the heavy lifting. Just make sure to keep the humidity down, or you might end up with a finish that looks like it just got out of a sauna.
| Advantages | Disadvantages |
|---|---|
| Cost-effective | Slow process |
| Less energy usage | Susceptible to dust |
Heating Methods: Accelerated Drying
Then there was the time I tried painting the kitchen cabinets with polyurethane paint. After hours of sanding and prepping, I realized this paint wasn’t going to set just by leaving it overnight. That’s when I discovered the magic of heating methods. Using ovens or drying tunnels, you can speed up the drying process significantly. For example, polyurethane paint cures beautifully at 60-80°C over 2-4 hours, but be wary of overheating—it can lead to discoloration15 or bubbling.
- Temperature Control: Overheating can cause issues, so it’s all about balance.
- Ventilation: A must to safely get rid of solvent vapors.
Surface Preparation Impact
Let me tell you, surface preparation is everything. I once skipped this step and paid dearly with a flaky disaster. Using appropriate cleaning agents16 like isopropyl alcohol can make a world of difference in adhesion. Sanding with 240-800 grit sandpaper beforehand enhances roughness for better grip.
Surface Reflection: Pre-paint sanding with 240-800 grit sandpaper enhances surface roughness, which improves paint adhesion and durability.
Chemical Treatments for Enhanced Adhesion
For those tricky surfaces like PP or PE, chemical treatments might be your best bet. Techniques such as corona treatment17 can boost surface energy and help your paint stick like glue.
- Template Treatment: A quick oxidizing zap.
- Primer Application: Think of it as a bonding agent between your paint and plastic.
Ensuring Quality Post-Painting
Quality checks are your safety net. I learned this the hard way when my "perfect" finish started peeling after a week. Conduct thorough inspections and tests like scratch and tape peeling tests to ensure your hard work lasts.
| Inspection Method | Purpose |
|---|---|
| Appearance Check | Identify visual defects |
| Specified Force Test | Assess adhesion strength |
By mastering these techniques, you’re not just painting; you’re crafting a finish that lasts, whether it’s for personal projects or professional masterpieces. So next time you pick up that brush or spray gun, remember these insights to achieve results that are as durable as they are beautiful.
Natural drying is faster than heating methods.False
Natural drying is slower, as it relies on ambient conditions, unlike heating.
Surface preparation improves paint adhesion and durability.True
Cleaning and sanding enhance adhesion, reducing defects and increasing durability.
How do I conduct a quality inspection for painted products?
Remember the last time you painted a room and missed a spot? Imagine that on a product line scale—yikes! Here’s how to nail those quality checks for painted goods.
Inspecting painted products means scrutinizing their appearance, adhesion, and smoothness. Use scratch tests, visual inspections, and tape peeling tests to ensure high-quality paint standards are met.

When I first delved into product inspection, it felt like trying to spot the minute differences in a "spot the difference" puzzle. Yet, over time, I realized the beauty lies in the details.
Surface Preparation
In my early days, I remember thinking a quick wipe would suffice before painting. However, preparing the surface area18 is more like prepping a canvas. A clean surface is non-negotiable. I often use isopropyl alcohol to eliminate oils and dirt; think of it as giving the product a fresh start. For that perfect finish, sandpaper—ranging from 240 to 800 mesh—is your best friend to enhance surface reflection. On particularly tough materials like PP or PE, I’ve found chemical treatments like corona or primer indispensable to improve paint adhesion.
Paint Selection
Choosing paint can be as daunting as picking the right shade for your walls—except with higher stakes. ABS plastics pair well with acrylic or polyurethane paints, whereas PC plastics demand a more cautious approach to prevent corrosion. Once, I learned the hard way that selecting wear-resistant options19 for automotive parts versus decorative ones for toys can make or break the end product.
Painting Method
Every time I pick up an air spray gun, I’m reminded of how vital technique is to quality. Spraying needs precision—maintaining a 15-25 cm spray distance can be a game-changer. For intricate products, I prefer brush painting; it’s akin to using a fine brush on delicate artwork. Dip coating, on the other hand, feels like submerging products in a paint bath—ensuring uniform coverage.
Drying and Curing
Natural drying works for volatile paints but can feel as slow as watching paint dry—literally! Heating methods using ovens expedite the process, which I’ve found essential for paints like polyurethane. Yet, controlling temperature is key to avoiding bubbling disasters.
Quality Inspection Techniques
- Appearance Inspection:
- Check for uniform color and gloss.
- Identify defects like sagging or orange peel.
- Specified Force Test:
- Use scratch tests to evaluate adhesion.
- Conduct tape peeling tests to assess paint durability.
| Inspection Type | Purpose | Tools Required |
|---|---|---|
| Appearance Inspection | Detect defects in color and texture | Visual inspection tools |
| Specified Force Test | Evaluate adhesion and durability | Scratch tools, tape |
Mastering these inspection techniques20 has made me appreciate both the aesthetic and functional longevity of painted products.
Surface preparation affects paint adhesion.True
Proper cleaning and sanding improve paint adherence, preventing peeling.
All plastics can use the same paint type.False
Different plastics require specific paints to avoid damage or poor adhesion.
Conclusion
Learn effective techniques for painting injection molded products, focusing on surface preparation, paint selection, application methods, and quality inspection to achieve durable and visually appealing finishes.
-
Learn how removing contaminants enhances paint adherence and ensures a smooth finish. ↩
-
Discover how sanding techniques improve surface roughness and paint adherence. ↩
-
Explore chemical treatments that enhance surface energy for better paint bonding. ↩
-
Find out which spray painting tools are ideal for different surface areas. ↩
-
Learn about the types of paints compatible with ABS plastic to ensure optimal adherence and finish. ↩
-
Discover paints that won’t damage polycarbonate plastics, maintaining product integrity. ↩
-
Find effective cleaning agents to prepare plastic surfaces for painting. ↩
-
Understand how to choose paints based on the functional requirements of your plastic products. ↩
-
Explore detailed guides and case studies on painting injection molded products effectively. ↩
-
Discover how spray painting achieves a flawless finish, ideal for large surfaces. ↩
-
Discover how chemical treatments alter surface properties to enhance paint adhesion. ↩
-
Learn why corona treatment is ideal for achieving durable automotive finishes. ↩
-
Find additional methods for boosting paint adhesion on challenging surfaces. ↩
-
Learn how natural drying works best for volatile paints like nitrocellulose lacquer. ↩
-
Discover why controlling temperature during curing is vital to prevent paint defects. ↩
-
Find out which cleaning agents are best for preparing surfaces to enhance paint adhesion. ↩
-
Explore how corona treatment increases surface energy, improving paint adhesion on plastics. ↩
-
Cleaning surfaces ensures better paint adhesion, preventing issues like peeling or uneven coatings. ↩
-
Wear-resistant paints enhance durability, crucial for automotive applications facing regular wear and tear. ↩
-
Inspection methods help maintain high quality by identifying defects early in the production process. ↩